Garage door openers are super important for getting into your home easily, but sometimes they can be a pain, leaving you feeling stuck and annoyed. If you forgot the code or ran into a glitch, it’s really helpful to know how to reset garage door opener. In this piece, we’ll break down some simple, step-by-step ways to reset your garage door opener, whether you’ve got a keypad or not. By following these straightforward steps, you’ll be back in control and make sure your garage door works like a charm again. So, let’s jump into the world of garage door opener resets and make it easy for everyone!
Understanding Parts Of Garage Door Opener
Before we jump into how to reset garage door opener, let’s check out what makes your garage door opener work. It’s smart to know what you’re dealing with!
- Motor: First off, the motor is up on the ceiling and powers the whole system.
- Remote Control: Plus, the remote control lets you open and close the garage door from way over there.
- Sensors: Finally, the sensors sit near the bottom of the door to keep things safe by spotting any obstructions.
Also, there are various kinds of garage door openers—like chain, belt, and screw drive models. Knowing which one you’ve got will make resetting it much easier.
Why You Might Need to Reset Garage Door Opener?
Now that you know what’s going on in your system, let’s chat about why you might need a reset. Here are some usual situations that call for it:
- Remote not working: If your remote isn’t working even after swapping out the batteries, giving it a reset could do the trick.
- Wall switch unresponsive: Sometimes, the wall switch just won’t respond, which could hint at a bigger problem with the system.
- New home setup: If you’ve just moved into a new place, resetting the system helps make sure that no one else can get into your garage.
- Changed the remote batteries: Lastly, after you’ve changed the batteries in the remote, you might need to reprogram it to get it working again.
- Garage door light is blinking and not opening: And if the garage door light is blinking and not opening, that’s another sign a reset might be the fix.
What To Do Before You Reset Garage Door Opener?
Before you dive in, there are a few things you should get ready. Here’s what to check out:
- Grab the owner’s manual: First off, having the manual close by can help you with steps that are specific to your model.
- Look for physical damage: Also, take a look at the system for any signs of wear and tear or damage that might mess with how it works.
- Understand the process: Moreover, make sure you know how to reset it so there aren’t any unexpected surprises.
- Type Of Garage Door Opener: Finally, it is important to understand if your garage door opener comes with a keypad or not. This is because there are different ways to reset them.
How to Reset Garage Door Opener Without A Keypad?
Now that you’re ready, let’s walk through how to reset garage opener that does not have a keypad. Follow these steps, and your system should be up and running in no time.
Step 1: Power Off the Opener
First, you’ll need to cut power to the opener. This usually means unplugging the unit or turning off the circuit breaker.
Step 2: Reset the Remote Control
Next, we’ll focus on resetting the remote:
- Open the battery cover: To start, remove the battery cover and check the batteries.
- Press the reset button: After replacing the batteries, press and hold the reset button inside the remote.
Step 3: Reset the Garage Door Opener Unit
Now, let’s reset the entire garage door opener system:
- Locate the “home” or “learn” button: First, find the button labeled “home” or “learn” on your motor unit, usually near a small LED light.
- Hold the button: Next, press and hold the button for about 15 to 30 seconds.
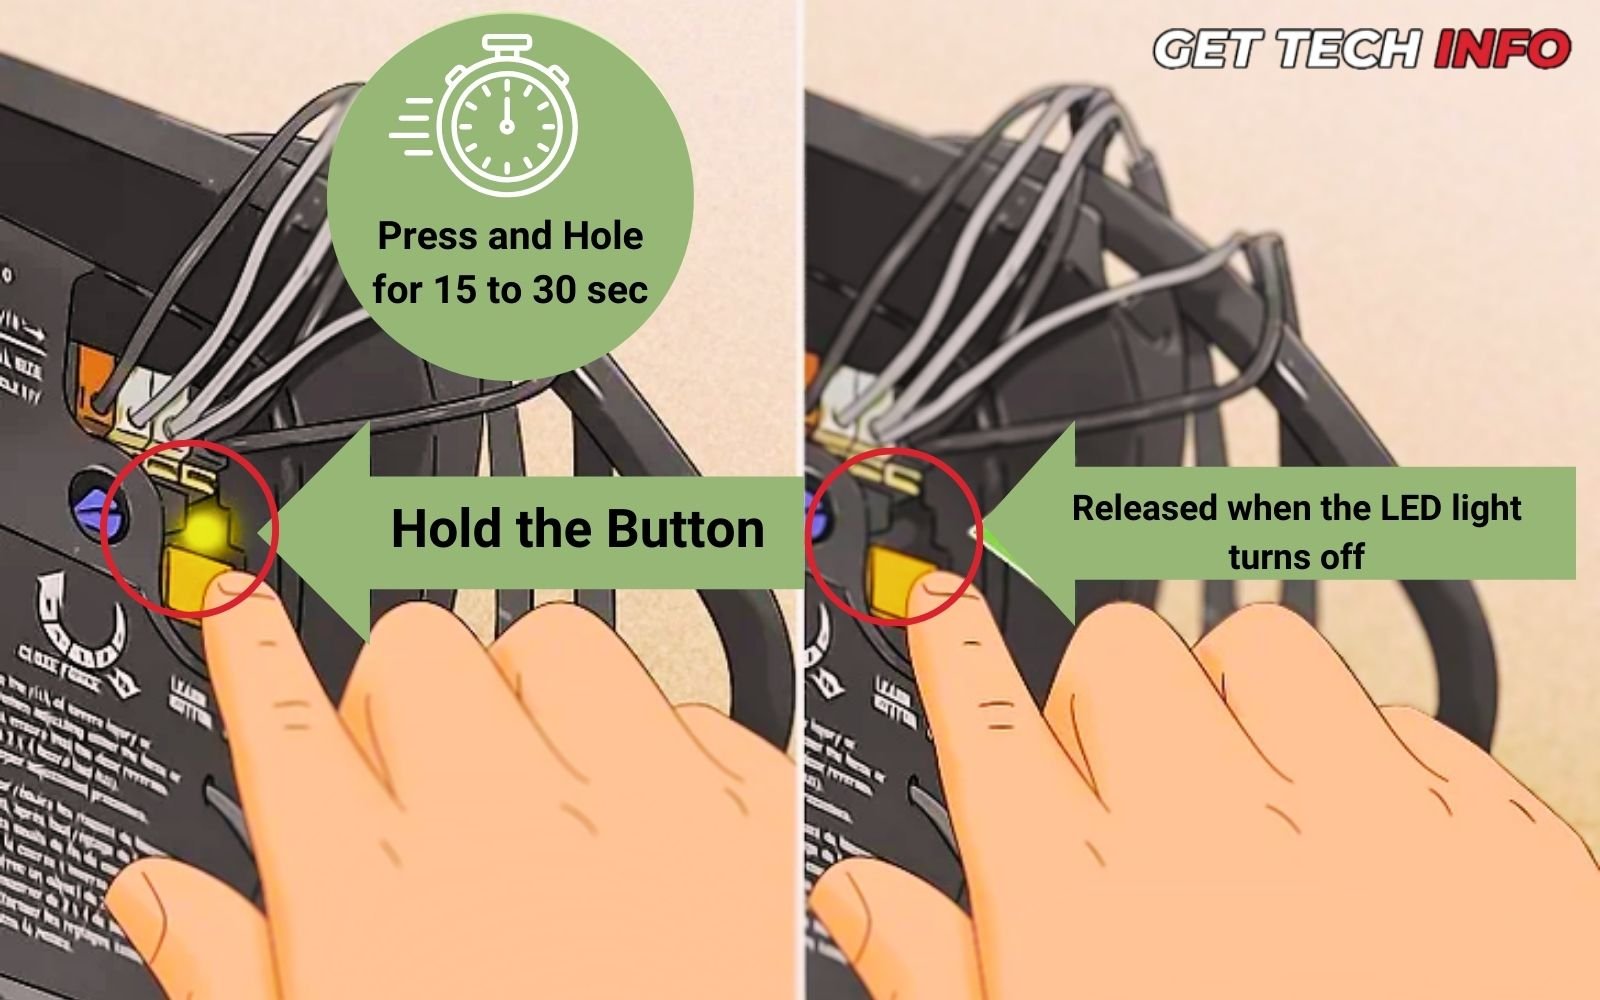
- Wait for the LED: When the light turns off, it’s a sign that the system has been reset. From here, you’ll reprogram the remotes or keypad as needed.
Step 4: Reprogram the Remote
After you successfully reset garage door opener, it is time to reset the remote. This is because resetting a garage door opener will erase all the remotes that are paired with it. Just follow these steps:
- Tap the “home” or “learn” button: First, give the button a quick press (don’t hold it down).
- Wait for the LED to blink: This indicates the system is ready to pair with your remote.
- Press the remote button: Now, press the button on your remote. Make sure to do this within 30 seconds, or you’ll have to repeat the process.
This is especially helpful if your garage door light is blinking and not opening, as it can often resolve that issue.
Using Keypad To Reset Garage Door Opener
If your garage door opener includes a keypad, resetting the code is simple. Follow these steps to get it done:
- Open the panel on your garage door opener: Most models have a small panel on the side or top of the unit. If your garage door opener has one, then open it.
- Press the ‘Learn’ button: It’s often red or orange and located on the side of the motor. Hold it until the light-emitting diode (LED) turns off, which cancels the old code.
- Enter your new code: Press the ‘Learn’ button again, then quickly go to your keypad and enter the new pin within 30 seconds. After pressing ‘Enter,’ the garage door opener will confirm with a light flash or click.
This quick process will reset your garage door code, giving you more security and convenience!
Reprogram the Keypad
Finally, after you reset garage door opener, you will have to reset the keypad and create a new code. Here’s how you can do it:
- Tap But Don’t Hold the “home” or “learn” button: Now quick tap on the learn button, but make sure not to hold it.
- Enter the new code: Then, quickly type your new pin on the keypad. Most systems use a four-digit code, but some may allow five or six digits.
- Press enter: After entering your code, press enter to lock it in.
Some systems may require you to press the “home” button again to finalize the setup. Once that’s done, your keypad will be ready with the new pin.
Setting a Temporary PIN
Now suppose you need to provide temporary access for, say, a delivery person. If so, then follow these additional steps to create a temporary PIN on your keypad.
- Type your permanent PIN.
- Instead of pressing ‘Enter,’ press the ‘*’ key.
- Enter your temporary PIN, and press ‘Enter.’
Setting Time Validity Of PIN
You can even set how long the temporary PIN is valid by pressing numbers that indicate hours or the number of times the door can be opened.
First, decide how long you want the temporary PIN to work:
- If you want the PIN to be active for a certain number of hours, simply press the ‘*’ key.
- On the other hand, if you prefer to set the number of times the door can be opened using that PIN, press the ‘#’ key instead.
Next, choose the time or number of uses:
- After pressing either ‘*’ or ‘#’, go ahead and select a number. For example, pressing ‘9’ would make the PIN active for 9 hours or allow 9 openings.
What Should You Do After Resetting The Garage Door Opener?
After resetting everything, it’s time to test your system.
- First, check if the remote works. Then, test the wall switch.
- Also, don’t forget to verify that the safety features—like obstacle detection—are functioning properly by placing something in the door’s path to see if it reverses.
Additional Tips for Maintaining Your Garage Door Opener
To avoid future headaches, regular maintenance can go a long way. Here’s what to keep in mind:
- Inspect for loose parts: To start, periodically check the system for any parts that might have loosened.
- Clean the sensors: Additionally, make sure the sensors are clean and aligned to prevent malfunctions.
- Change the batteries regularly: To ensure smooth operation, replace remote batteries before they die completely.
- Update software: Lastly, consider updating your opener’s software or firmware to stay current with the latest security features.
And don’t forget to keep your codes secure—only share them with people you trust!
When to Call a Professional
At some point, you may notice issues that go beyond what a simple reset can fix. If your garage door is moving unevenly, making strange noises, or still not functioning properly after resetting, it might be time to call a professional. A technician can assess and resolve more serious mechanical problems.
Conclusion
Hopefully, understanding how to reset garage door opener doesn’t have to be complicated. With these simple steps, you’ll have it working again in no time. If your garage door light is blinking and not opening, or your remote has stopped responding, following these steps should fix the issue. And remember, if the problem persists, a technician can help you get things back to normal.
FAQ
Will resetting my garage door opener affect my remotes?
Yes, resetting clears all paired remotes, so you’ll need to reprogram them after the reset.
Can I reset garage door opener if I’ve lost the remote?
Yes, you can reset it using the Learn button on the opener, but you’ll need to get a new remote or keypad to operate it afterward.
How often should I reset garage door opener?
There’s no set schedule, but if you experience issues, it’s a good idea to try resetting it as a first step.